DekTek Tile's Sister Joist Installation Method is one of the main installation options when installing the concrete deck tiles on elevated decks.
Sister Joist Installation Brochure PDF
Framing For DekTek Tile's Concrete Decking:
Step 1.
Frame joists 16-inches on-center (OC). Add lateral blocking, same width as existing joists, a maximum of 4-feet OC.

Step 2.
A) Add sister joist to each existing joist. If joists are capable of supporting 10.5-pounds per sq. ft. dead load, then a 2x4 sister joist is sufficient. Otherwise, a full-length joist the same size as the existing will need to be added. The deck frame must be able to support a dead load of 10.5 pounds per square foot.
B) Place joist spacers no more than 24 inches apart in between the main joist and sister joist. Use two 16d galvanized nails or 3.5-inch screws to fasten the sister joist to the spacer and into the main joist. Add more 16d nails or 3.5-inch screws every 12 inches through the sister joist.
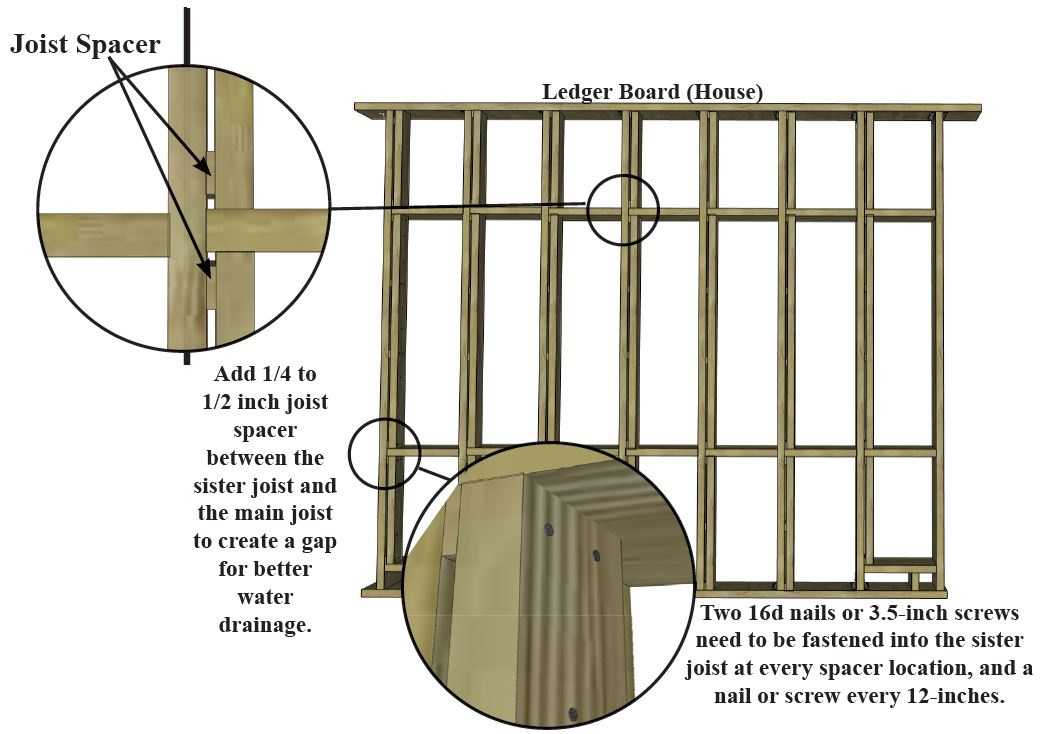
Add 1/4 to 1/2 inch joist spacer between the sister joist and the main joist to create a gap for better water drainage.
Two 16d nails or 3.5-inch screws need to be fastened into the sister joist at every spacer location, and a nail or screw every 12-inches.
Step 3.
Install the edge trim. Borders must be mechanically fastened at the outside edges to lock in the tiles. The most common border options are wood, composite, anodized aluminum, galvanized steel, or raising the facia board on the side of the deck 7/8" to lock in deck tiles. Border trim against house is optional.

Step 4.
DekTek Tile must be sealed with a high-quality solvent-based concrete sealer. (See sealing video below.) First, apply on all four sides of the tile and then the top of tile before installing. Do not seal bottom of tile. See sealing brochure for more information.

Setting The Deck Tiles
Step 5.
First layout the tile grid plan for overall tile positioning. When you start setting the tile, be sure to choose varied colors from the order to make sure the colors are mixed nicely. The tile must have a minimum of 1 inch bearing on each joist. Please note: Any tile cut to 10 inches or less needs extra support running under the bottom of the tile (i.e. an added 2x4). (See Deck Installation Tips For Planning & Installing Your DekTek Tile Concrete Tile Deck Video)
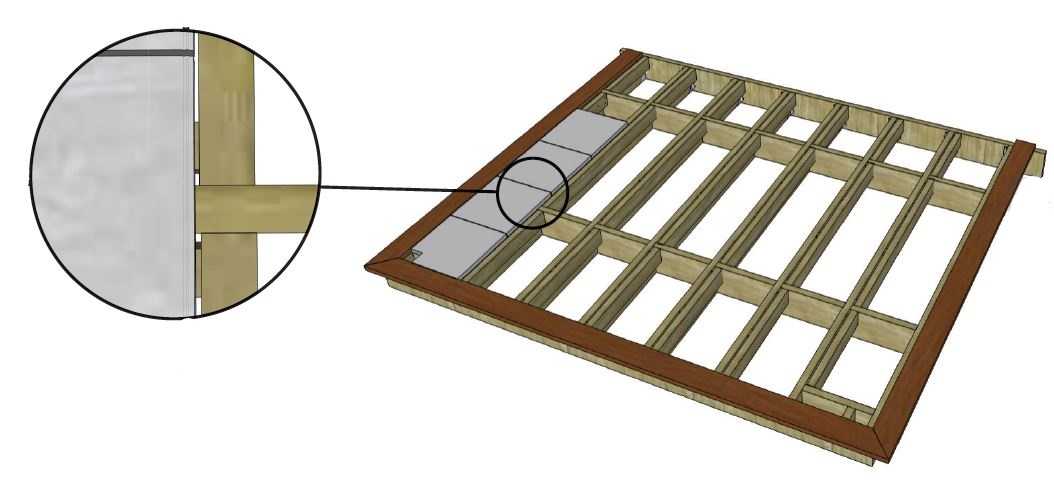
Tile is then set using a high quality exterior polyurethane adhesive directly to wood joists. Apply recommended adhesive (see adhesive brochure) to the joists as you lay your tile. Space tile joints 1/16 to 1/8 inch apart to allow for water drainage and the expansion / contraction of the tile. The joist spacing created in step 2, should be directly below the tile joints, as shown in the close-up, for the best water drainage. Cut tiles where needed. The tiles easily cut with a wet tile saw.
Tile setting skills are highly recommended.
Setting Equipment Needed:
- Caulk Gun
- 10" Wet Diamond Saw
- Chalk Line
- Tape Measure
For installation questions, please call 218-380-9330 or email us at info@dektektile.com. Thank you!
Sealing
DekTek Tiles should be sealed with a high-quality concrete sealer on top and all sides before installing. Be careful not to apply sealer to bottom of tile. When sealer is applied to bottom of tile it can break the bond of the adhesive.
Do not use a brush when sealing the surface of DekTek Tiles. It would be okay to use on the sides of the tiles if needed but using a brush on the top of the tile will cause brush marks.
Doubling Up The Deck Joists When Installing DekTek Tile’s Concrete Decking Using the Sister Joist Installation Method
Usually when installing the Sister Joist System, you have your main joist (often a 2x10 or 2x12) and then a 2x4 sister joist is added to the main joist to allow enough room for the deck tiles to sit on.

In certain situations however, a contractor or DIYer may need or prefer to double up the joists for added structural support. For example, on a deck remodel located in a state with less stringent framing requirements—such as many southern states that don't need to account for snow loads—if the existing joists are 2x8s spanning 10 feet or more, adding a 2x4 joist alone likely wouldn’t provide sufficient support. In cases like this, where additional strength is required, doubling up the joists would be the appropriate solution.
It is not required to double up the joists for all DekTek Tile deck installations, only when structurally needed or desired.

Important Installation Details:
- "It is essential that the deck frame or supporting structure is properly engineered to bear the weight of the concrete deck tiles, which is a dead load of 10.5 pounds per square foot. In many northern U.S. states, where snowfall is prevalent, if a deck were built up to code, framing is usually sufficient, with the minor modification of adding the Sister Joist or Sleeper System. But again, it’s critical that the framing is specifically designed to support the 10.5 pounds per square foot of the decking tile.
- If you are adding a sister joist or doubling the joists because additional structural strength is needed for the deck tiles, it’s very important that the sister joist or joist added to double up the framing, are fastened to the ledger board and outer beam, not just attached to the main joist itself. This install technique significantly increases the overall structural strength of the deck.
- Whenever you’re building a DekTek Tile deck or outdoor space, ensure that you follow all applicable state and local building codes.
Framing Tip:
If you are unclear as to what size of deck joists you need for your deck installation, you can often consult your local lumber supplier. You will need to provide them with all your deck framing details:
- Deck Dimensions
- The distance the deck framing spans from the house/building to the outside perimeter of the deck.
- The location of the supports and beams.
- It is also important to let them know you will be using a deck tile that weighs 10.5 pounds per square foot.
They should be able to calculate the framing requirements (joists/beams/supports) needed for you.
If you have any additional questions, feel free to contact our team at 1-877-335-8453 or email us at info@dektektile.com.
Sealers for DekTek Tile
DekTek Tile ONLY applies sealer to sample tiles. We do not ship deck orders sealed, unless requested for an upcharge. It is the responsibility of the client to seal the tiles.
We recommend using a good solvent-based sealer that is for acid stained or stamped concrete. We do not recommend any specific brand. There are many brands of concrete sealers on the market that are high quality. Please feel free to consult your local concrete expert.
One initial brand that we used with success for over 8 years is "Gator Seal," made by Alliance. Unfortunately, the manufacture has discontinued this product. We now sell Bright Kure & Seal made by TK Products, which has been tested in the field with great success for over 6 years.
***DO NOT USE WATER-BASED SEALERS because they tend to peel. We also do not recommend using penetrating sealers as our tiles are too dense and it does not protect the tile surface.***
***Apply sealer using a 1/2" roller nap and roller pan before you install the tiles, which allows you to coat the edges of the tile for better protection. Paint brushes are not recommended. DO NOT SEAL BOTTOM of the tiles as this will trap moisture in the tile and
interfere with adhesion.***
***Only apply sealer in temperatures recommended by the manufacturer. Sealing warm/hot tiles is not recommended, may cause bubbling. Please note, many sealers cannot be
applied in cold temperatures. Be sure to seal indoors in a well ventilated area if there are cold temperatures outside.
***Tiles must be sealed within 21 days upon delivery. See DekTek's Storage Policy for more information.***
DekTek Tiles must be sealed every 3 years, especially in cold climates, to protect against freeze/thaw and other elements. By sealing your tiles every 3 years, this will give you the maximum longevity of the product.
***We recommend rolling on a layer of the sealer before you install the tiles, as this allows you to coat the edges of the tile for better protection.***
Sealers we've used with success:
Bright Kure & Seal - Glossy - TK Products
Bright Kure & Seal - Matte - TK Products
Satin Look Finish - Low Gloss - Alliance Gator
Wet Look Finish - High Gloss - Alliance Gator
Remove Cloudiness
It is common for some sealers to form a cloudy or foggy look after a period of time. DO NOT BE ALARMED, this is a normal occurrence, and it is easily fixed by using:
Xylene (or Xylol) – For Solvent-Based Sealer ONLY
Use Xylene (sometimes called xylol), and roll it on just as you would roll on another layer of sealer. We recommend one person rolling it on and having a second person back rolling with a dry roller nap to soak up the excess xylene. Another option, if two people are not available, is for you to roll on the xylene in a smaller area, and then back roll before the xylene evaporates. This method works well for the brand, Bright Kure & Seal.
If using a different brand of sealer, please check with the manufacturer to see if this system is approved. You can purchase Xylene from your local paint or hardware store.
Make Your Deck Non-Skid
Here are the simple steps to give your deck a slip-resistant surface:
- Add a specially designed slip-resistant additive to the sealer. DekTek Tile carries Shark Grip by Sherwin Williams.
- 1 bottle of Shark Grip (3.2oz) will be sufficient for 2 to 3 gallons of sealer.
- First, add sealer to the roller pan.
- Next, sprinkle in 1/2 of a cap of Shark Grip into the roller pan along with sealer. Mix well.
- Repeat each time you refill the roller pan with sealer. Be sure to stir occasionally and don't forget to stir the Shark Grip with each new batch.
- Enjoy your Non-Skid deck!
How To Give Your Deck An Extra Non-Skid Surface:
- We recommended adding an extra slip-resistant surface on these applications:
- Stairs and Steps
- Pool Decks
- Decks that get snow and winter traffic
- Or if you want to take extra precautions
- While you add Shark Grip and follow the instructions listed above, you will also sprinkle a large pinch of fine sand grit across the roller pan (washboard area).
- As you roll the roller nap with sealer and Shark Grip on it, it will also pick up the sand grit and deposit it on the tile when sealing, giving the tiles extra non-skid.
- Sprinkling the grit into roller pan must be done quite frequently (at least every other time you reload your roller with sealer).
- Enjoy your Non-Skid deck!
*DekTek, Inc. shall have no liability for defects or damage resulting from application of concrete sealer or surface treatments.* See DekTek Tile warranty.